To check your Apple Account balance, simply open the App Store app and tap on your profile icon, below your Apple ID current account balance will be displayed.
In today’s digital world, our lives revolve around our smartphones and the apps and services we use on them. For iPhone and iPad users, the Apple Account is at the center of it all. Your Apple Account not only provides access to a wide range of Apple services like iCloud, Apple Music, and the App Store, but it also holds your payment information and account balance.
Key Takeaways
- Your Apple Account balance is a credit that can be used for purchases in the App Store, Apple TV, Apple Music, iTunes, Apple Arcade, iCloud, and other Apple services.
- You can check your Apple Account balance on your iPhone, iPad, Apple Vision Pro, Mac, iMac, Windows PC or online via a web browser by signing into your account.
- Funds can be added to your Apple Account balance by redeeming gift cards or adding money directly, which can be used for subscriptions, app purchases, and other digital content.
- Family Sharing allows family members to make purchases using their own account balances, with the family organizer’s payment method being charged if a member’s balance is insufficient.
What is Your Apple Account Balance?
First things first, let’s define what we mean by your “Apple Account balance.” Your Apple Account, which is tied to your Apple ID, can hold a credit balance that you can use towards purchases in the App Store, Apple TV, Apple Music, iTunes, Apple Arcade, iCloud storage upgrades, and other Apple services. This balance is separate from any credit or debit card you may have linked to your account for automatic payments.
There are a few ways your Apple Account can accumulate a balance:
- You can directly add funds to your account.
- You can redeem Apple Gift Cards or App Store & iTunes Gift Cards.
- You may receive a credit from Apple, such as a refund for a purchase or a promotional offer.
Knowing your current balance can help you manage your spending and make informed decisions about purchases or subscriptions.
How to Check Your Apple Account Balance on Your iPhone, iPad or Apple Vision Pro
Checking your Apple Account balance on your iOS device is a breeze. Just follow these simple steps:
- Open the App Store app on your iPhone, iPad or Vision Pro.
- Tap on your profile icon in the top right corner of the screen.
- Tap on your Name, your Apple ID and current account balance will be displayed.
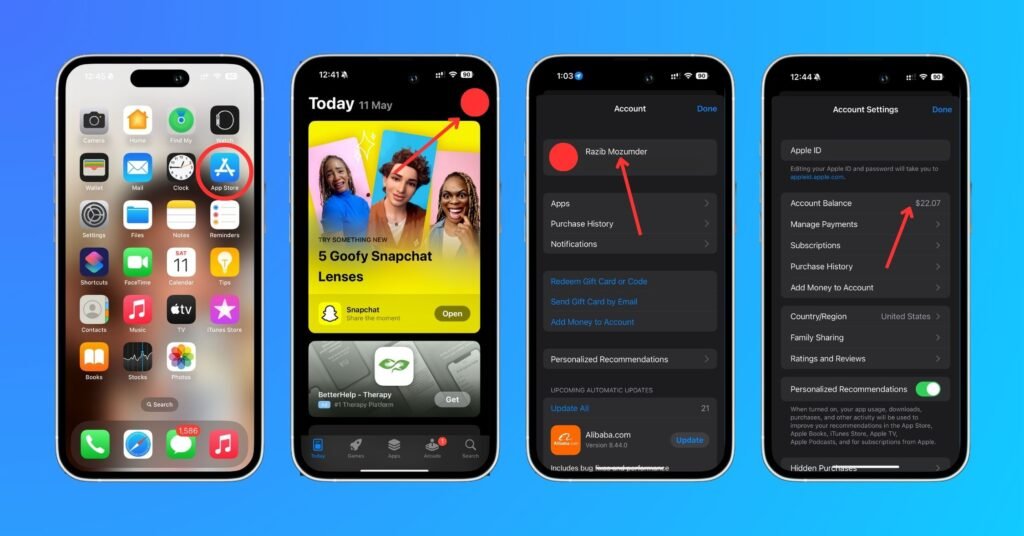
That’s it! In just a couple taps, you can see exactly how much credit you have available in your account.
Checking Your Balance on a Mac or iMac
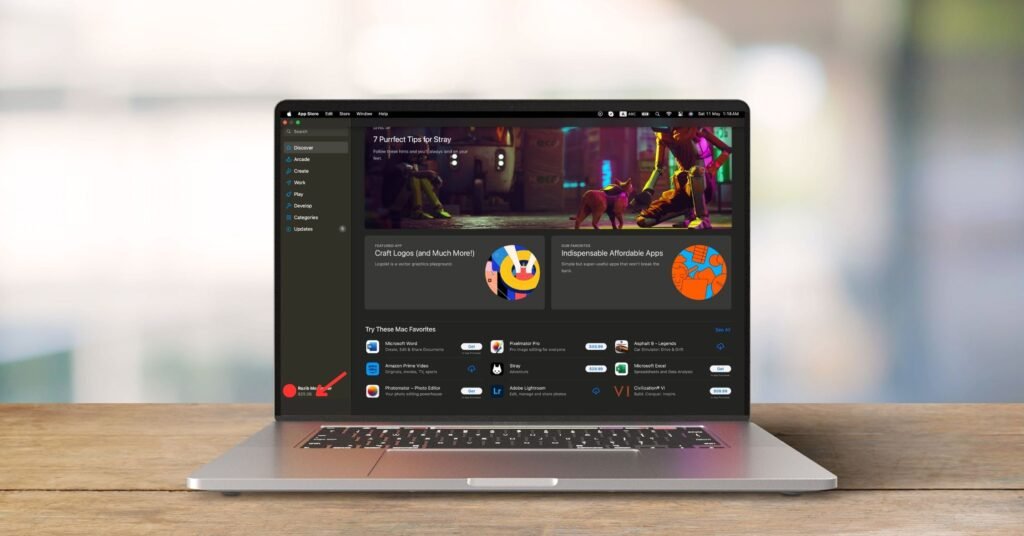
If you’re on your Mac computer, you can check your Apple Account balance through the App Store or iTunes:
Via the App Store
- Open the App Store app.
- Your account balance will be shown under your name at the bottom left corner of the window.
Via Apple Music App
- Open Apple Music App.
- You may be asked to sign in with your Apple ID.
- Once signed in, from the menu bar at the top of your screen, choose Account.
- You’ll see your account balance under Apple ID Account.

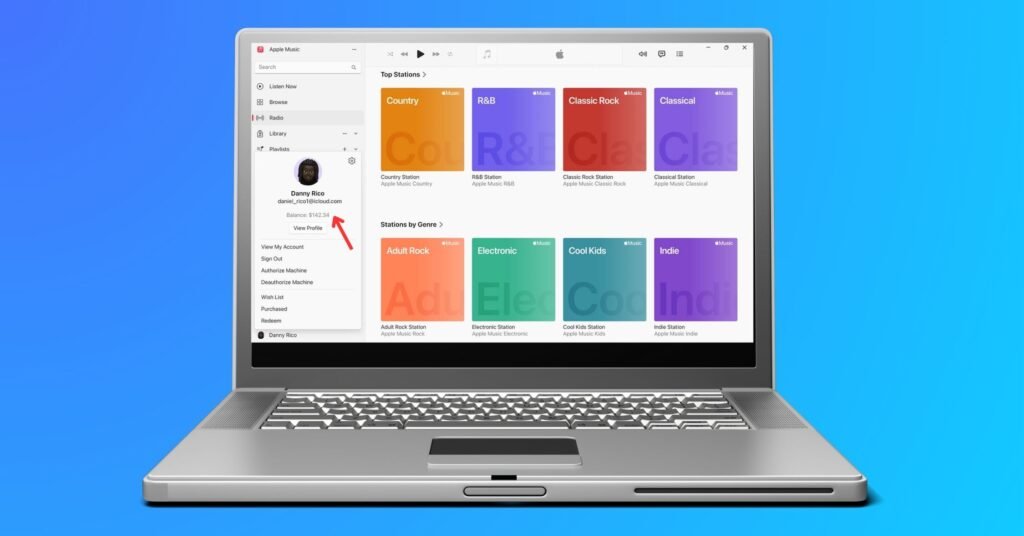
Check Your Apple Account Balance on a Windows PC
If you’re a Windows user, you can still easily check your Apple Account balance using the Apple Music or Apple TV app. Here’s how:
- Open the Apple Music app or Apple TV app on your Windows PC.
- Click on your name at the bottom left corner of the window. If you’re not already signed in, you’ll need to enter your Apple ID and password first.
- Once you’re signed in, look below your name, account balance will be shown.
This method provides a convenient way for Windows users to keep track of their Apple Account balance without needing to access an Apple device or the Apple website.
Check Your Balance via a Web Browser
You can also check your balance by signing into your account on the Apple website:
- Go to appleid.apple.com in any web browser.
- Sign in with your Apple ID and password.
- In the Account section, you’ll see your current Apple Account balance.
This method is particularly handy if you’re not near your Apple devices or if you’re using a Windows PC.
Also read: How To Easily Add A Gift Card To Apple Wallet: Step-by-Step Guide
Adding Funds to Your Apple Account
Now that you know how to check your balance, let’s discuss how to add funds to your account. You might want to do this if you don’t have a credit or debit card linked to your Apple ID, if you want to gift money to someone else to use on the App Store or iTunes, or if you prefer to preload your account with a set amount for budgeting purposes.
There are two main ways to add money to your Apple Account balance:
- Redeem a Gift Card or Code
- Add Funds Directly
Redeeming a Gift Card or Code
Apple Gift Cards, previously known as iTunes Gift Cards, are a common way to add credit to your account. You can purchase these cards at many retailers, including grocery stores, drugstores, and of course, Apple Stores. They come in various denominations and can be physical cards or digital codes.
To redeem a gift card:
- Scratch off the label on the back of the card to reveal the redemption code.
- On your iPhone or iPad, open the App Store app.
- Scroll to the bottom of the Featured tab and tap “Redeem Gift Card or Code.”
- Use your device’s camera to scan the code, or tap “You can also enter your code manually” and type in the code.
- Tap “Redeem” in the upper right corner.
The card’s value will instantly be added to your Apple Account balance.
If you have a digital code rather than a physical card, you can follow the same steps but select “Use Camera or Enter Code Manually” after tapping “Redeem Gift Card or Code.”
Adding Funds Directly
You can also add funds directly to your Apple Account from your iPhone, iPad, or iPod touch:
- Go to your device settings and tap on your name at the top.
- Tap “Payment & Shipping.” You may need to sign in with your Apple ID.
- Tap “Add Funds to Apple ID.” If you don’t see this option, it means you already have a payment method linked to your account and can’t add funds directly.
- Choose the amount you want to add. You can choose from preset amounts or tap “Other” to enter a custom amount.
- Confirm the payment with Face ID, Touch ID, or your passcode.
The funds will be charged to the payment method you have on file and will be added to your Apple Account balance immediately.
It’s important to note that funds added to your Apple Account balance cannot be refunded or transferred to a bank account. They can only be used for purchases through Apple’s platforms.
Also read: Can You Use Apple Pay at Sonic Drive-In?
Managing Subscriptions and Purchases
Your Apple Account balance can be used to pay for various subscriptions and purchases, including:
- Apple Music
- Apple TV+
- Apple News+
- iCloud Storage
- App Store purchases and in-app purchases
- iTunes movies, TV shows, and music
When you make a purchase or subscribe to a service, the cost will be deducted from your account balance first. If your balance doesn’t cover the full cost, any remaining amount will be charged to the primary payment method linked to your Apple ID.
To manage your subscriptions:
- Open the Settings app on your iPhone or iPad.
- Tap on your name at the top of the screen.
- Tap “Subscriptions.”
- Here, you’ll see all your active and expired subscriptions. Tap on one to see more details, change your plan, or cancel the subscription.
You can also manage subscriptions through the App Store on your Mac:
- Open the App Store app.
- Click on your name or profile icon in the bottom left corner.
- Click “View Information” at the top right. You may need to sign in.
- Scroll down to Subscriptions and click “Manage.”
To view your purchase history:
- On your iPhone or iPad, open the Settings app and tap on your name.
- Tap “Media & Purchases,” then tap “Purchase History.”
- Your purchase history will load, showing your recent purchases. Tap “Show More” to see older purchases.
If you have any issues with a purchase or subscription, such as being charged incorrectly or not receiving what you paid for, you can report a problem directly from your purchase history. Apple’s support team will investigate and may issue a refund to your original payment method.
Also read: Does Target Take Apple Pay? A Comprehensive Guide
Family Sharing and Apple Account Balances
If you’re part of a Family Sharing group, it’s important to understand how account balances work within the family. Family Sharing allows up to six family members to share App Store, iTunes Store, and Apple Books purchases, an Apple Music family plan, iCloud storage, and more.
When Family Sharing is set up, each family member uses their own Apple Account and has their own balance. By default, the family organizer’s payment method is used for all purchases made by family members. However, if a family member has a balance on their account, that balance will be used for their purchases before the family organizer’s payment method is charged.
Family members can still add funds to their own accounts and use those funds for their individual purchases without affecting the family organizer’s payment method.
It’s also worth noting that when you invite someone to join your Family Sharing group, you can choose whether to share your existing App Store, iTunes Store, and Apple Books purchases with them. Purchases made after the family member joins will be automatically shared.
Troubleshooting Apple Account Balance Issues
While managing your Apple Account balance is usually straightforward, you may occasionally run into issues. Here are a few common problems and how to resolve them:
Balance Not Updating After Redeeming a Gift Card
If you’ve redeemed a gift card but your balance doesn’t reflect the added funds, try signing out of your Apple ID and signing back in:
- On your iPhone or iPad, go to Settings > [Your Name] > Sign Out.
- After signing out, tap “Sign in to your iPhone” and enter your Apple ID and password.
- Check your balance in the App Store. It should now show the updated amount.
Can’t Add Funds Directly
If you don’t see the option to add funds directly to your Apple Account, it likely means you already have a payment method linked to your account. Apple only allows direct fund additions when no other payment method is set up. If you want to add funds directly, you’ll need to remove your linked payment method first.
Unexpected Charges
If you notice charges to your account balance that you don’t recognize, it could be from a subscription or an accidental in-app purchase. Check your purchase history to identify the charge:
- On your iPhone or iPad, go to Settings > [Your Name] > Media & Purchases > Purchase History.
- If you see a charge you don’t recognize, tap on it for more details.
- You can report a problem with the purchase directly from this screen if needed.
If you believe your account has been compromised and someone else is making purchases with your balance, change your Apple ID password immediately and contact Apple Support for further assistance.
FAQs
Yes, your Apple Account balance will be used first to pay for any subscriptions or purchases you make. If your balance doesn’t cover the full cost, the remaining amount will be charged to your linked payment method.
If you cancel your Apple ID, you’ll lose access to any remaining balance on your account. It’s best to use up your balance before canceling your account.
No, Apple Account balances cannot be transferred between different Apple IDs. The balance is tied to the specific account and can only be used by that account holder.
Funds that you add directly to your Apple Account balance do not expire. However, if you redeem a gift card, the funds may expire based on the terms and conditions of the specific card.
No, while Family Sharing allows you to share purchases and subscriptions, each family member’s account balance remains private. You can’t view or manage another family member’s balance.